How To Add Pictures In Resources
How To Add Pictures in Your Resources?
The different aspects of adding pictures is described here under different questions. This is mainly for the new members. But others who still face problems in adding pictures can also take the advantage from this article.
1. Why should I add pictures?
Well, the best question from you. Adding the pictures in your resources will beautify your resources' look and appealing. Think of those articles with a long writings and any picture. You will feel not to read them. But a single picture can change this. It makes the readers feel what the article is about. So add some pictures, if necessary.
2.How much pictures I can add in a Particular resource?
You can add any number of pictures in a particular resource. Remember that adding pictures to your resources is not a compulsory one. Don't add pictures for those resources which don't need it. It will be better if you add pictures to resources related to tourism. But adding large number of pictures with a small volume of article will be the worst to read. In fact, you must have gone through such boring article. So it will be better to add one or two pictures in your resources.
3. Where can I add pictures in my article?
You can add pictures in your resource section only. If you want to add pictures in business directory, you can submit them as an attachment below the content. There is another option also available for you. It's to add pictures in your gallery. You can start an album in the gallery and then upload pictures to the gallery. Then give a link to the album in your resource or as a thread to the album.
4.How To Add Pictures in Picture Gallery?
Adding pictures to your picture gallery is a simple task to do. There are some simple steps you need to follow.
Step I
Click on the 'Picture ' tag on the top left of the page. A new page will be opened there. Browse pictures from your PC to the gallery by clicking 'Browse'. Give appropriate tittle and summary to the loaded picture. This is important as this will tune your resource for Google adsense revenue sharing. The next step is to add a new album for this. Click on the space next to 'New Album' and give an appropriate name to your album. Also mention the number to which this picture is posted in the album. You can have numbers from 1 to 999. Then submit it. This is all you need to do to make an album and to post pictures in the album. From the next time onwards you are posting pictures to an album already created, no need to write tha name of the album in 'New album'. Select the album from the list of albums.
Step II
Now you need to give a link to this album in your resources. This is also simple to do. The code for adding the link to your resource is:
<a href="url">Link text</a>
In place of URL, you have to give the URL of the place where your gallery is present. You will get this from the top of the browsing tag. This will be something like this;http://www.spiderkerala.net/gallery/Album-ALBUM NAME.aspx. Copy that and paste it in place of the URL in the code. And give a proper name in place of 'Link Text'.
But understand that the picture can't be seen by the readers in your resource itself. They need to click on the link and reach the album to view them. This can be used if you are having more pictures about the resource.
5. How To Add Pictures as Attachments in Your Resources?
This is the second means by which you can add picture in the resource. This will enable you to show the pictures inside your resources and also as an attachment below your post. This is also simple to do. Follow the steps to add pictures and other attachments;
Click on the small box just before the tag,'I want to add attachments ', before submitting your resource.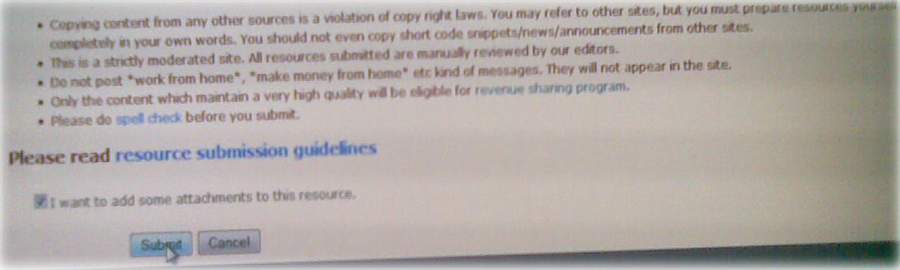
A new window will be opened showing the heading of your resource and a tag 'Add new attachment'.
Click on this tag. A new window showing the title of your resource and a tag 'Add new attachment' will be opened. Click on the 'Add new attachment' tab.
Now in the new window, browse for the pictures you want to add. Give proper title to the picture.
Now you have to take the important step regarding the picture; whether you want to show it as an attachment below the resource or you want to show it as a link in your resource itself.
If you want to add the picture inside the click on the box as shown in the picture below;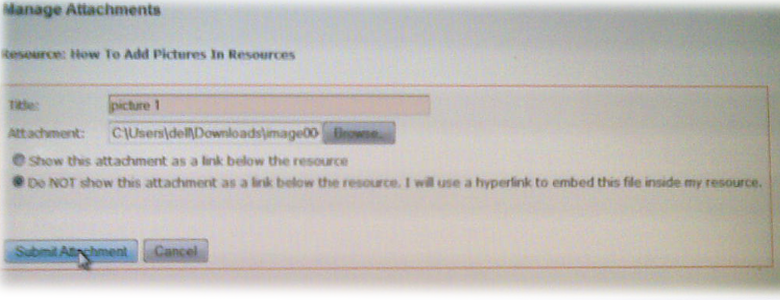
Then click on the 'submit' tag.
In the new window opened, copy the 'image link' and paste it where you want the picture.
To paste the attachments in the resource click on the edit tag at the top of your resource and then paste in the link in the content.
6.How To add pictures in 'Business Directory'?
You can't add pictures in the business directory as such.You can only give them just below your post. After posting the business, click on the 'Add picture' tag . The remaining procedures are just as prescribed as in above sections.